 Save
Save The first time I attempted a rosé velvet cake, my kitchen was awash in sunlight and the playful fizz of an open wine bottle felt oddly celebratory even on an ordinary afternoon. There’s something inherently joyful about mixing a blush-colored batter, the promise of elegance swirling in each bowl. As the scent of cocoa and vanilla mingled with soft notes of wine, I wondered if a cake could ever feel more festive. That moment, spatula in one hand and a little gold dust scattered across the counter, transformed my idea of party desserts. Somehow, the process itself felt like a celebration—no occasion required.
I once baked this cake the night before my cousin’s bridal shower, humming quietly as midnight drifted in, only to realize my neighbor’s cat was watching me through the window like a silent judge. There was a certain reverence in stacking the blushing layers, spreading the creamy rosé frosting with slightly shaky hands, and knowing that by morning it would be the glittering centerpiece of the party. Guests gasped at the gold drip’s shimmer, and someone whispered that it tasted even better than it looked. That moment made me realize food traditions can begin spontaneously, one golden cake at a time.
Ingredients
- All-purpose flour: Go for a gentle hand here—overmixing is the enemy of soft, velvety crumb.
- Granulated sugar: Creamed with butter, it gives the cake its delicate lift and sweetness.
- Baking soda & Baking powder: Both combine to give an airy rise that keeps the layers plush.
- Salt: Just enough emphasis to balance and round the flavors beneath the sweetness.
- Unsweetened cocoa powder: A subtle chocolate hint—use good quality to let the blush hue and cocoa both shine.
- Unsalted butter: Start with truly soft butter for the fluffiest cake and silkiest frosting.
- Buttermilk: Lends tangy depth and beloved tenderness to every slice.
- Rosé wine: Choose a bottle you’d drink—it should taste fresh, floral, and not too sweet, since you’ll taste it in every bite.
- Eggs: Let them sit at room temperature for best mixing (I place them in warm water if I’m impatient).
- Vanilla extract: Don’t skip—vanilla lifts and marries the flavors as they bake.
- White vinegar: Just a touch helps the cake stay moist and brings out its signature velvet texture.
- Pink food coloring gel: Use sparingly and build up slowly for the blush-pink you have in mind (I always test on a spatula, not just the bowl).
- Cream cheese: For the dreamy, tangy-sweet frosting—bring it fully to room temperature for smoothest results.
- Powdered sugar: Sift first! It prevents stubborn lumps in your cowboy-frosting dreams.
- White chocolate chips & heavy cream: This pairing makes a glossy drip that sets beautifully—cool it enough or risk a runny waterfall.
- Edible gold luster dust & vodka/clear extract: It’s all about that glamorous, gilded finish—you need just a tiny brush and a little patience for gold magic.
Tired of Takeout? 🥡
Get 10 meals you can make faster than delivery arrives. Seriously.
One email. No spam. Unsubscribe anytime.
Instructions
- Prep for Glory:
- Preheat your oven to 350°F (175°C), and line three 8-inch round cake pans with parchment paper so nothing sticks when you flip to reveal those pink layers.
- Sift & Whisk:
- Combine flour, cocoa, baking soda, baking powder, and salt in a bowl, giving the mix a little lift and ensuring every bite is tender and even.
- Cream Like You Mean It:
- Using an electric mixer, whip butter with sugar for a solid 3 minutes—it should look pale and impossibly fluffy.
- Add the Riches:
- Mix in eggs one at a time, blending well, then pour in vanilla for a fragrant cloud, swirling the aroma through your kitchen.
- Pour in Pink:
- Add buttermilk, rosé, and vinegar, then slowly incorporate the dry ingredients; mix until just combined so your cake stays plush, not dense.
- Find Your Blush:
- Stir in pink food coloring with a gentle hand, stopping when you hit that dreamy rosy hue—be patient, it deepens as you mix.
- Divide & Bake:
- Pour batter evenly into the prepared pans and slide onto the center rack for 30–35 minutes, or until a toothpick comes out clean and edges pull slightly from the pan.
- Cool & Marvel:
- Let cakes cool in the pans for 10 minutes, then turn onto wire racks to cool completely—the hardest wait, but necessary for frosting perfection.
- Rosé Cream Cheese Frosting:
- Beat butter and cream cheese together until smooth, then slowly add sifted powdered sugar so the mix stays silky; finish with rosé, vanilla, and a pinch of salt, whipping until dreamily fluffy.
- Layer & Crumb Coat:
- Trim cake tops if needed, then stack the layers with generous frosting between each; apply a thin crumb coat, chill for 30 minutes, then frost the whole cake for a gorgeous finish.
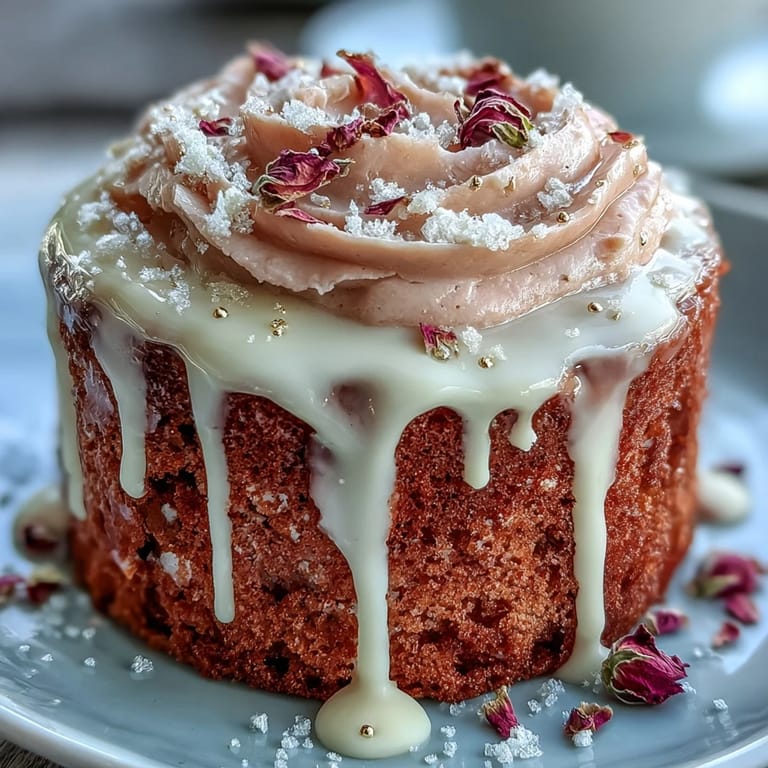
- The Gold Drip:
- Microwave white chocolate and heavy cream in bursts, stirring until smooth; let it cool, then drip along the cake’s edge with a small spoon or bottle for those chic golden tears.
- Gilded Touch:
- Mix gold luster dust with vodka or extract, then gently paint the cooled white chocolate drip using a food-safe brush—it’s oddly calming and deeply satisfying to see the shimmer grow.
- Final Chill:
- Pop the finished cake in the fridge for at least 30 minutes before slicing so every piece cuts cleanly and tastes just right.
 Save
Save  Save
Save The first time someone said this cake looked too beautiful to eat, I laughed—and then watched as the first forkful drew instant silence at the table. In that pause, it became more than dessert: it was a memory in pink and gold, savored together in real time.
How to Nail the Rosé Flavor
After lots of experimenting, I found that using a fruity, dry rosé—not sweet—lets the wine sing gently beneath the cocoa and vanilla without overpowering the cake. For an extra boost, brushing a little rosé over cooled layers intensifies the perfume and makes each bite taste like a toast to something special.
Decorating in Real Life (Gold Drip Edition)
I struggled the first time I attempted the gold drip; my lines were lopsided and one edge looked far more abstract than chic. The secret is letting the chocolate cool enough to thicken—it should fall slowly, not in a rush, when spooned at the edge. Don’t worry if your first try isn’t runway ready; even uneven drips look magical under edible flowers and a scatter of berries.
Party-Ready Cake Moves
Bringing this cake to a party, I discovered that a cake carrier with a locking lid is priceless (ask me about rogue gold dust sometime). Slice with a hot, clean knife for professional edges, and don’t forget to snap a photo before it’s devoured in record time.
- Carry extra frosting in a small jar for last-minute touch-ups.
- Chill the finished cake well to keep the gold drip crisp in warm rooms.
- Wash your brush between gold coats—clean tools make for flawless glitter.
 Save
Save 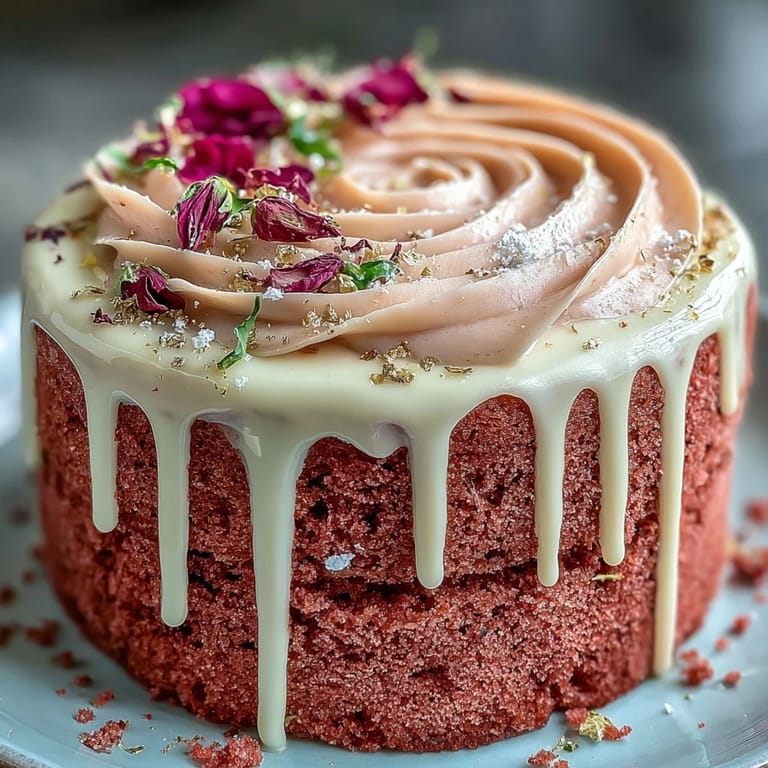 Save
Save May your next celebration be as beautiful—and delicious—as this blushing cake. I hope it brings as many grins and golden crumbs to your table as it has to mine.
Recipe FAQs
- → How can I boost the rosé flavor without adding too much liquid?
Brush lightly between layers with a few teaspoons of rosé once the cake has cooled; this adds aroma without oversaturating. You can also fold a bit more rosé into the frosting, balancing with extra sifted powdered sugar to keep texture.
- → What non-alcoholic swap keeps the flavor profile?
Substitute sparkling grape juice or a concentrated white grape reduction for rosé. Reduce any added liquid slightly and adjust sweetness to taste so the crumb stays tender but not soggy.
- → How do I get a smooth, stable cream cheese frosting?
Ensure butter and cream cheese are both room temperature and beat until fully smooth before adding sugar. Sift powdered sugar to avoid grit, beat just until combined to keep the frosting light, and chill briefly for easier handling when layering.
- → Tips for a clean gold drip finish?
Warm white chocolate and cream until just smooth, cool to lukewarm, then test drips on the side of a bowl. Apply with a spoon or squeeze bottle, let set, then mix gold luster with a small amount of clear spirit or extract and paint gently with a food-safe brush.
- → How should I store and serve the cake?
Keep chilled in a covered cake box; remove from fridge 20–30 minutes before serving so flavors open up. For best texture, slice with a hot, dry knife wiped between cuts.
- → How can I prevent layers from sinking or cracking?
Do not overbeat the batter and avoid overfilling pans; bake until a toothpick comes out clean and let layers cool in pans 10 minutes before turning out. Level only once fully cooled to reduce tearing.