 Save
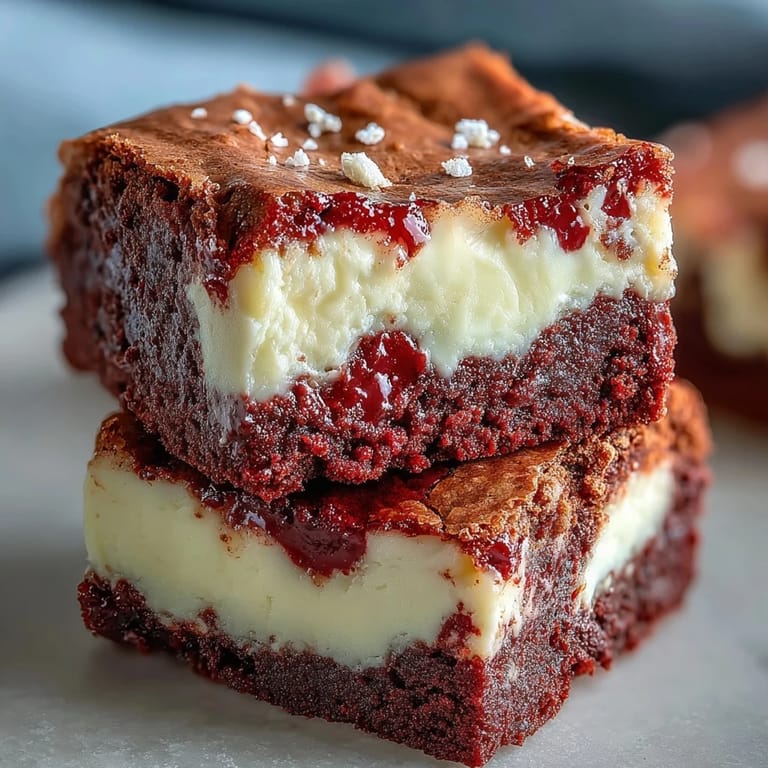
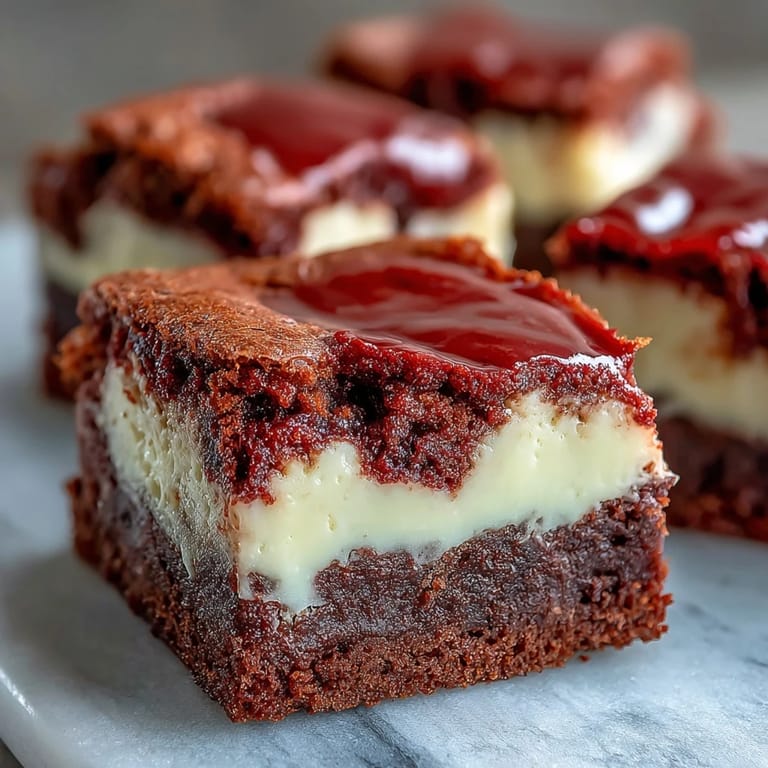
Save The kitchen smelled like cocoa and something faintly tangy when I pulled these out of the oven for the first time, and I knew immediately I'd made something dangerous. My sister had challenged me to combine her two favorite desserts into one pan, and I wasn't sure it would work until I saw those crimson swirls marbling through the ivory cheesecake. The edges were crisp, the center still wobbly, and when they cooled I could barely wait the full two hours before cutting a corner piece. That first bite was pure velvet against cream, fudgy and rich and completely worth the mess I'd made of my countertop.
I brought a batch to a potluck once, and they vanished before the main course even hit the table. People kept asking if I'd ordered them from some boutique bakery, and I just smiled because the truth was I'd thrown them together in under an hour that morning. One friend swore she didn't like red velvet, then quietly came back for thirds. There's something about the contrast, the way the tangy cheesecake cuts through the sweetness of the brownie, that makes them addictive in a way I still can't fully explain.
Ingredients
- Unsalted butter: Melted butter gives the brownie layer that dense, fudgy crumb instead of a cakey texture, and using unsalted lets you control the saltiness perfectly.
- Granulated sugar: This dissolves smoothly into the butter and creates a shiny top crust that cracks just right when you cut into the cooled brownies.
- Eggs: Room temperature eggs blend more easily and help both layers set without curdling, so pull them out of the fridge while you gather everything else.
- Vanilla extract: A little goes into both the brownie and cheesecake to tie the flavors together with that warm, familiar sweetness.
- Red food coloring: Gel gives you the most vibrant color without thinning the batter, but liquid works fine if that's what you have on hand.
- All purpose flour: Just enough to give structure without making the brownies cakey, and sifting it with the cocoa prevents lumps.
- Unsweetened cocoa powder: This deepens the chocolate flavor and gives red velvet its signature subtle cocoa backbone.
- Cream cheese: Softened to room temperature, it whips into a lump free layer that stays creamy even after baking.
- Salt: A small pinch in the brownie batter sharpens all the other flavors and keeps the sweetness from feeling flat.
Tired of Takeout? 🥡
Get 10 meals you can make faster than delivery arrives. Seriously.
One email. No spam. Unsubscribe anytime.
Instructions
- Preheat and prep the pan:
- Set your oven to 175°C and line your square pan with parchment, letting the edges hang over like little handles. This makes lifting the whole slab out later so much easier.
- Mix the red velvet base:
- Whisk melted butter and sugar until they look glossy, then beat in the eggs, vanilla, and food coloring until the batter turns that unmistakable crimson. Sift in your dry ingredients and fold just until no white streaks remain, being careful not to overwork it.
- Spread the brownie batter:
- Pour most of the red batter into your prepared pan, saving about a quarter cup in the bowl for swirling later. Smooth it out gently with a spatula so it covers the bottom evenly.
- Whip the cheesecake layer:
- Beat the cream cheese until it's silky, then add sugar, egg, and vanilla, mixing until completely smooth. Pour this over the red velvet base and spread it to the edges.
- Create the swirls:
- Drop spoonfuls of the reserved red batter on top of the cheesecake, then drag a knife or skewer through in looping motions. Don't overthink it, random swirls always look best.
- Bake until just set:
- Slide the pan into the oven for 35 minutes, watching for the center to look barely firm with a slight jiggle. A toothpick should come out with a few moist crumbs clinging to it, not wet batter.
- Cool and chill:
- Let the pan cool completely on a wire rack, then refrigerate for at least two hours before cutting. This firms up the cheesecake and makes slicing clean and easy.
 Save
Save My nephew once asked why they were red, and I told him it was because they were made with magic and a little bit of mischief. He believed me for years, and now every time I make them he still calls them magic brownies, even though he's old enough to know better. It's become our thing, this batch of swirled squares that show up for his birthday every year without fail, and I don't think I'll ever get tired of the way his face lights up when he sees that pan come out of the fridge.
Getting the Swirl Just Right
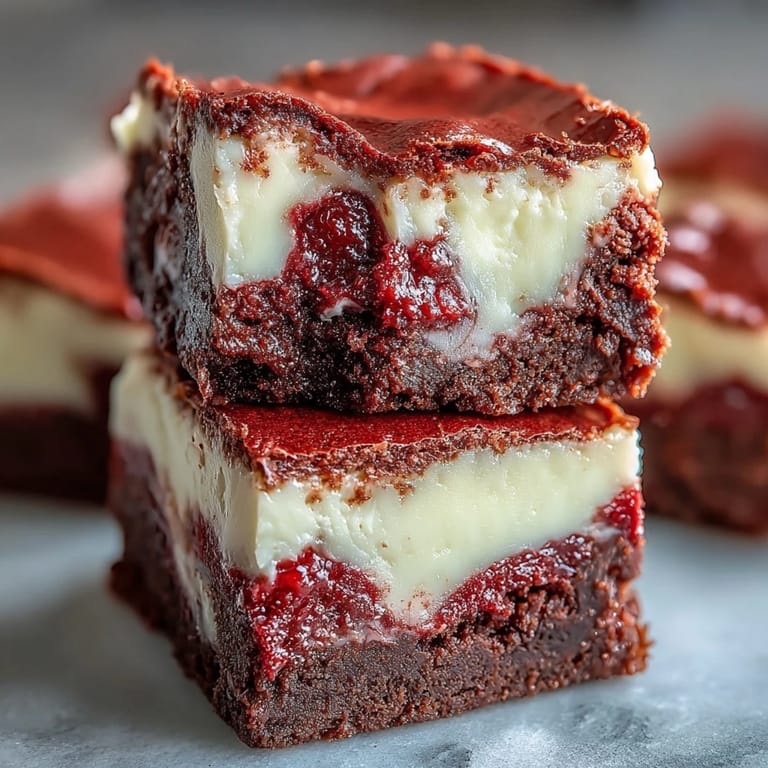
The swirl is where you get to play a little, and honestly, there's no wrong way to do it as long as you don't stir the layers together completely. I like to drop the reserved batter in uneven dollops, then pull my knife through in figure eights and loops, lifting it between strokes so the colors stay distinct. Some people prefer straight lines or zigzags, and both look gorgeous once baked. The key is not overdoing it, because too much swirling muddies the contrast and you lose that striking red on white pattern that makes these so eye catching.
Storage and Serving Tips
These brownies keep beautifully in the fridge for up to five days, tucked into an airtight container where they stay fudgy and moist. I've even frozen individual squares wrapped in plastic and foil, and they thaw perfectly on the counter in about an hour. For serving, I like to let them sit out for just ten minutes so the cheesecake softens slightly, making each bite even creamier. If you want to get fancy, a dusting of powdered sugar or a drizzle of melted white chocolate takes them over the top, but honestly they're stunning enough on their own.
Making Them Your Own
Once you've nailed the basic recipe, it's easy to riff on it depending on what you're craving or what's in your pantry. I've stirred white chocolate chips into the red velvet batter for extra richness, and I've swapped the vanilla in the cheesecake for almond extract when I wanted something a little more complex. A friend of mine adds a handful of crushed Oreos between the layers, and another swears by a thin layer of raspberry jam under the cheesecake for a fruity tang.
- Try mini chocolate chips in the brownie batter for pockets of melty sweetness.
- A teaspoon of espresso powder in the cocoa deepens the chocolate flavor without making it taste like coffee.
- For holidays, swap red food coloring for green or pink to match the occasion.
 Save
Save Every time I pull a pan of these from the oven, I'm reminded that the best recipes are the ones that make people pause mid conversation and reach for seconds. These brownies do that every single time.
Recipe FAQs
- → Can I use natural food coloring instead of artificial red dye?
Yes, you can use natural alternatives like beet powder or natural red food coloring. Keep in mind the color may be less vibrant, and you might need to adjust the quantity for desired intensity.
- → Why do my brownies need to be refrigerated before cutting?
Refrigerating allows the cheesecake layer to set properly, making clean cuts much easier. The cold temperature firms up both layers, preventing messy, crumbly edges when slicing.
- → Can I make these in a different pan size?
Yes, but adjust baking time accordingly. A 9x13-inch pan will yield thinner brownies that bake faster (check at 25 minutes), while a smaller pan requires more time.
- → How do I know when the brownies are perfectly done?
The center should be just set with a slight jiggle, and a toothpick inserted should come out with a few moist crumbs—not wet batter. Overbaking will dry them out.
- → Can I freeze these brownies for later?
Absolutely! Wrap individual squares tightly in plastic wrap, then place in a freezer-safe container. They'll keep for up to 3 months. Thaw in the refrigerator overnight before serving.
- → What's the best way to create perfect swirls?
Use a knife or wooden skewer to gently drag through the layers in figure-eight or circular motions. Don't over-swirl—a few strategic strokes create the most dramatic effect.