Save
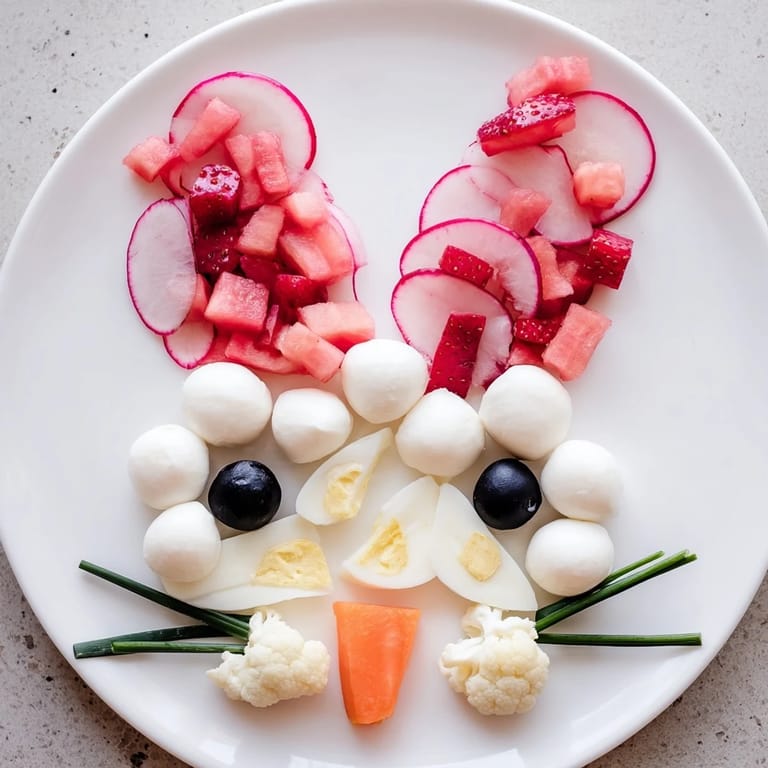
Save I still remember the Easter morning my daughter gasped when she saw the bunny platter I'd arranged on our dining table. She was four, and her eyes went wide as saucers—not at the individual ingredients we'd prepared together, but at how they'd transformed into something magical. That's when I realized that food isn't just about nourishment; it's about creating moments of wonder. The Bunny Silhouette became our springtime tradition, a dish that brings joy before anyone even takes a bite.
Last spring, I made this for my sister's garden brunch, and what started as a simple appetizer became the conversation piece of the entire afternoon. People were so enchanted by the bunny's design that they actually paused before eating—and for a food platter, that's the highest compliment.
Ingredients
- Large sheet parchment paper or serving platter: Your canvas for creativity. A marble or wooden board adds elegant contrast to the vibrant colors
- Black olives, 1 cup: These form the outline of the bunny's head and ears. Buy whole ones if possible—they create cleaner lines than sliced
- Diced strawberries, 1 cup: Sweet, jewel-like pieces that catch the light beautifully in the ears and draw the eye instantly
- Diced watermelon, 1 cup: The lighter pink adds dimension and keeps the pink sections feeling fresh rather than one-note
- Pink beet hummus, 1 cup: This was my secret weapon for depth of color and flavor. It's earthy, creamy, and gives texture variation
- Radish slices, 1/2 cup: Peppery little discs that add crunch and keep the pink palette interesting
- Mini mozzarella balls, 1 cup: These milk-white spheres are almost like tiny eggs themselves—perfectly smooth and pristine
- Cottage cheese, 1 cup drained: Lumpy, cloud-like texture that fills space generously and keeps things light
- Hard-boiled eggs, 2 sliced: Pure white circles that anchor the face and provide satisfying protein
- Cauliflower florets, 1 cup: Tiny trees of white that add playful texture—they're also the sturdiest ingredient for staying fresh
- Fresh chives, 1 tablespoon finely chopped: Whiskers that add a whimsical finishing touch and a subtle onion flavor
- Carrot piece, 1 small: A cheerful orange nose that ties the whole character together
- Blueberries, 2: Eyes that somehow make the bunny come alive. Choose ones that are similar in size for balance
Tired of Takeout? 🥡
Get 10 meals you can make faster than delivery arrives. Seriously.
One email. No spam. Unsubscribe anytime.
Instructions
- Lay your foundation:
- Spread your parchment or platter across your workspace. Take a moment to visualize the bunny—head roughly in the center, ears extending upward. This mental map makes everything that follows feel purposeful rather than random
- Map out the bunny with olives:
- Starting with your black olives, create a clear outline. Make the head a generous oval and the ears two tall pointed shapes above it. Don't worry about perfection—these olives are guides, not boundaries. I like to arrange them slowly, adjusting as I go, almost like I'm drawing
- Fill the ears with pink magic:
- This is where the platter transforms. Begin layering your pink ingredients into the ear sections. I alternate strawberries, watermelon, radish, and beet hummus in loose rows. Don't think of this as precise filling—think of it as painting with food. Let colors blend slightly at the edges. This is the part that makes people stop and stare
- Create the white face:
- Now fill the bunny's face with your white and cream-colored ingredients. Scatter the mozzarella balls like fresh snow. Dollop the cottage cheese in generous clouds. Arrange egg slices as you would think a bunny's face would look. Tuck cauliflower florets into the spaces like tiny details. Step back frequently—you're sculpting a portrait
- Add the character:
- Place your two blueberries where eyes would naturally sit—slightly inward, expressive. Position your carrot nose just below. Sprinkle chives around the lower face like whiskers. These final touches are crucial—they're what transform an arrangement into a character
- Chill and compose:
- Place your finished bunny in the refrigerator until serving time. This keeps ingredients fresh and lets colors deepen slightly. Bring out about 15 minutes before serving with crackers or vegetable sticks alongside. Let your guests admire it for a moment before they dive in
 Save
Save My nephew once asked if the bunny was real before he ate it. That question, asked so earnestly, reminded me why this dish works—it genuinely celebrates the natural beauty of vegetables and dairy, arranged with intention and playfulness. That's the real magic here.
Making It Your Own
The Bunny Silhouette is wonderfully flexible. I've made it with raspberries instead of strawberries for a deeper pink (stunning), and once used thinly sliced pink grapefruit when berries weren't in season. The structure stays the same, but your personal touches make it distinctly yours. Think of the black olive outline as permission to experiment with everything inside it. That's the joy of this dish—it's a framework for creativity, not a rigid formula.
Timing and Preparation
Since there's no cooking involved, your biggest time investment is in the prep work—washing, cutting, and arranging. I like to prep my ingredients about an hour before assembly. Have everything in small bowls, ready to go. Then the actual assembly becomes a meditative act rather than a rushed scramble. You can arrange this in as little as 10 minutes once everything is prepped, which means you're free to focus on your guests and the celebration itself.
Serving Suggestions and Pairings
This platter shines as the centerpiece of a spring brunch or Easter gathering. The fresh, light ingredients pair beautifully with morning drinks—sparkling rosé, elderflower lemonade, or even champagne with a strawberry. Serve it with good crackers (I prefer seeded or herb varieties) and vegetable sticks like cucumber rounds or carrot batons. The crackers give texture and allow guests to build their own bites, which always feels more interactive and festive. If you're hosting an afternoon gathering, offer it alongside cheese and cured meats to create a fuller spread.
- Choose a large enough platter—overcrowding makes arrangement difficult and the presentation less impactful
- Chill all wet ingredients (strawberries, watermelon, eggs) before assembly so they don't release moisture prematurely
- Keep your carrot nose and blueberry eyes covered until the last moment if you're working in a warm kitchen—they dry out faster than you'd expect
 Save
Save Every time I make this, I'm reminded that the best recipes aren't about technique or exotic ingredients—they're about intention and joy. This bunny silhouette is proof that simple, honest food, arranged with care and playfulness, creates memories that last far longer than the meal itself.
Recipe FAQs
- → How do I make the bunny outline distinct?
Use whole or sliced black olives to clearly trace the rabbit's head and long ears on the serving platter for a sharp outline.
- → Can I substitute the pink fillings?
Yes, raspberries or pink grapefruit segments can replace strawberries and watermelon for a similar vibrant effect.
- → What alternatives are there for dairy ingredients?
Vegan cheese or plant-based cottage cheese options can be used to accommodate dairy-free preferences.
- → How should the platter be served and stored?
Chill the assembled platter until serving. Pair it with crackers or vegetable sticks for added texture and flavor.
- → Is this dish suitable for gluten-free diets?
Yes, using gluten-free crackers and verifying ingredients ensures the dish meets gluten-free requirements.